Whether you are a Photoshop newbie or a guru, there is always something new to learn or discover in this extensive image editing software. One of the joys of using it, is that there are many ways to do the same thing in Photoshop. Here are a few tips that are useful to improve your workflow, either by speeding it up or adding a few tweaks to your process.
1. Copyright Metadata Tip
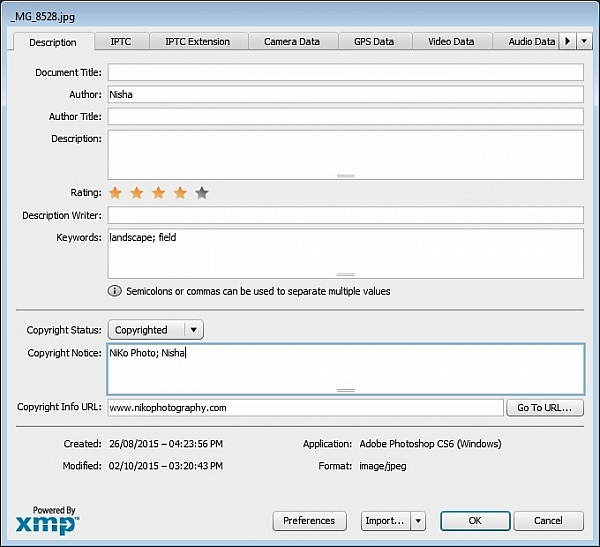
Many people use the terms watermarking and copyrighting interchangeably, but these are two different things. While arguments continue for and against watermarking images, in this digital age copyrighting your photos is still highly recommended. One of the best ways of doing this, is to embedding the copyright information right into the metadata of your image.
Follow these steps:
- Click Ctrl + Alt + Shift + I (Mac: Command + Option + Shift + I), or go to File > File Info to bring up the Metadata panel
- Click on the Description tab (left one) and enter your copyright information in the relevant fields
2. Color Correcting with Curves Tip
As you may know, there are many way to correct color in Photoshop, and you may have even experimented with using a Curves Adjustment layer to achieve this. Sometimes, while working on this layer to color correct an image, you may inadvertently make the image lighter (or darker).
An easy fix that allows you to apply your color correction, without affecting the tonal values of the image, is to set the Curves Adjustment layer’s Blending Mode to Color.
3. Double Windows Tip
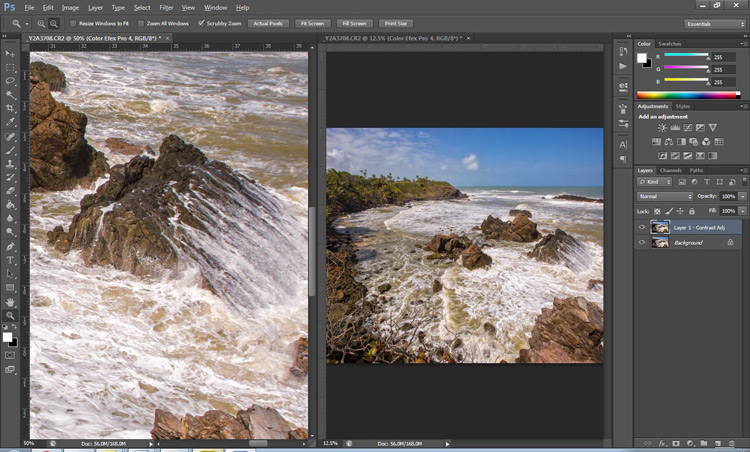
Zooming into your images can be helpful when editing details, but it can feel like a chore if you constantly have to zoom in and out to see how your changes affect the overall image. A simple solution to your problem is to open the same image in two windows. Now you will be able to put them side by side, at different zoom levels for your comparative purpose.
- With your image open, go to Window > Arrange > New Window for [file name of your image]. This this will open up a second window for the original image.
- Then, go to Window > Arrange > 2-Up Vertical and this will put your windows adjacent to each other. Now you have one zoomed out for an overall picture, and you can zoom in to edit the other.
The coolest part is that all the adjustments you make to one window, will be reflected in the other.
4. Contrast with Channel Mixer Tip
The Channel Mixer is an easy way to add great contrast to an image.
- Create a new Channel Mixer adjustment layer.
- Choose Black and White With Red Filter from the preset drop-down (in the Properties Panel).
- Change your blending mode for the adjustment layer to Soft Light.
- Play around with the opacity of the layer until you get the desired level of contrast.

Original Image
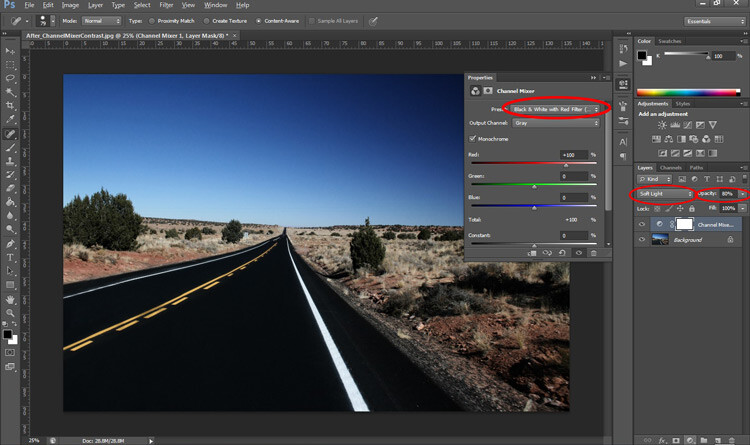
Image Contrast changed using Channel Mixer
5. Content Awareness Tip
Several tools use Content-Aware, which is Photoshop’s method of examining your image, and calculating which pixels are needed to repair the selected area. At times though, even awesome tools such as the Healing tool or the Content Aware fill, do not return the best results when applied
If you are not happy with what the tool has returned, simply apply the adjustment again. Yes you read that correctly, you can apply content aware a few times and get a more desirable result the second or third time around.
6. Better Black & White Image Tip
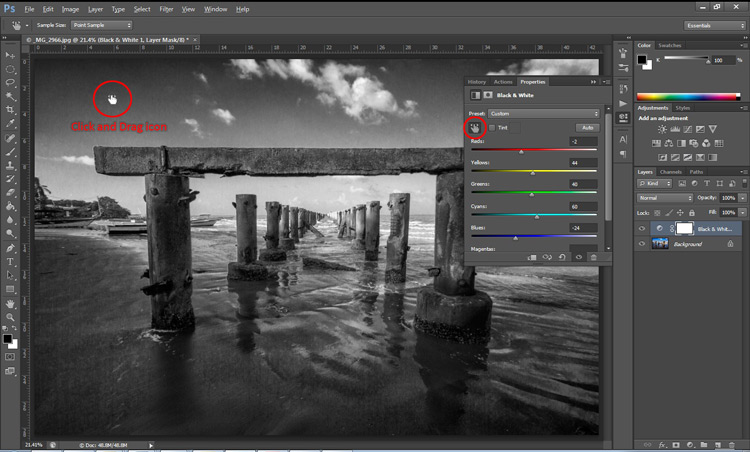
Making a black and white photo can be as easy (and boring) as desaturating your images (using Image > adjustment > desaturate). If you want to take it up a notch, try using a Black and White adjustment layer (from the Layers panel), where you can use up to six color sliders to control the main colors in your image, and adjust the relative brightness of each color.
While you’re there, check out the very useful click and drag (targeted adjustment tool) icon. Click it, then click and drag (hold the button in while you drag) on any area of the image that you wish to make darker or lighter— to the left for darker, right to make it lighter
7. Getting Historical Tip
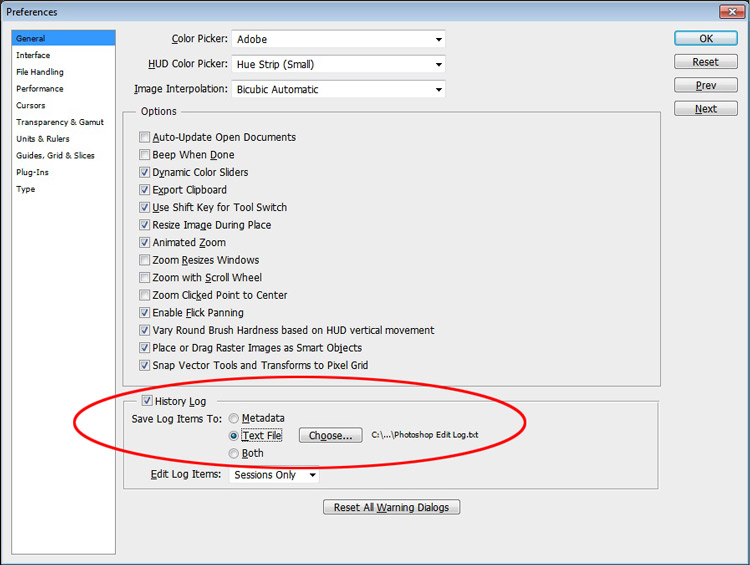
Have you ever wanted to repeat your timely editing on another image and found your memory unreliable? Photoshop’s History Log is a great feature to turn on if you want to keep a text record of every single step you have done to your image.
- Click Ctrl + K (Mac: Command + K) to bring up the Preferences panel.
- In the General tab check the History Log and the Text File box, and choose a location to save the file (name it for easy reference later on).
Now when you work on your image, and Photoshop will record every step you take. If you ever want apply the same steps to another image, just locate the text file and review.
8. Check Spelling With Photoshop Tip
Spell check is not something that would come to mind when you think of Photoshop, but yes it can do that too. All you have to do is click on Edit > Check Spelling and your visible text layers will benefit from more accuracy.
9. Revealing Hidden Detail Tip
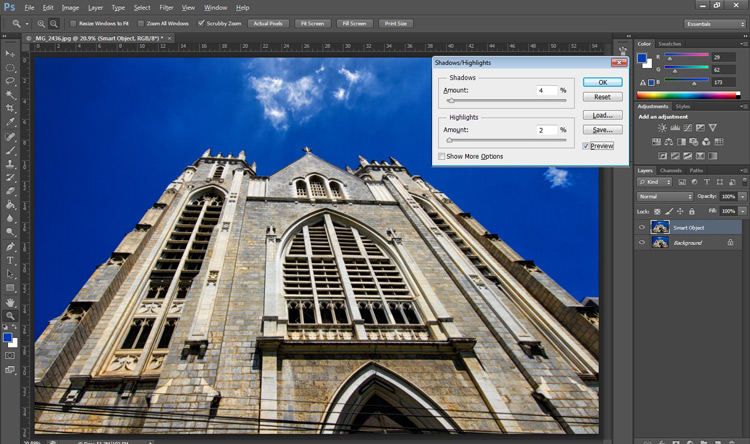
To bring out hidden detail in the shadows and highlights of your image, one of the best tools is the (you guessed it) Shadow/Highlight Adjustment. Sadly though, it is not available for application via an Adjustment Layer, so for non-destructive use, first convert your layer to a Smart Object.
Then go to Image > Adjustments > Shadows/Highlights and apply to recover those details.
10. Close Everything Tip
Did you know you can close all your open images at once? Simply hold down the Shift key and click the close icon on any of your image windows.
Conclusion
While there are several ways to accomplish a task in Photoshop, hopefully there was something new hidden in these quick tips. Were any of these new to you or did you discover a new way to execute an old favorite? Maybe you can share some other must-know, or time saving tips, that you use to be more efficient at post-processing in Photoshop.
Don’t have Photoshop yet? Here’s your discounted dPS offer for Adobe’s Creative Cloud Photography plan
The post 10 Quick Photoshop Tips to Improve Your Workflow by Nisha Ramroop appeared first on Digital Photography School.